


|
|
ESP-12EESP8266
|
x 1 | |
|
|
NEO-6M GPS Module |
x 1 | |
|
|
OLED Display Module |
x 1 | |
|
|
FP6291 Boost Converter IC |
x 1 | |
|
TNPV1206499KBEENVishay Dale
|
x 1 |

|
FritzingFritzing
|
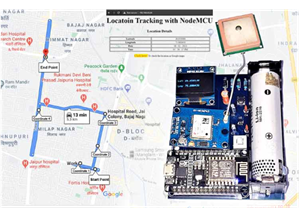
IoT GPS Tracker with NodeMCU and Google Maps
Overview
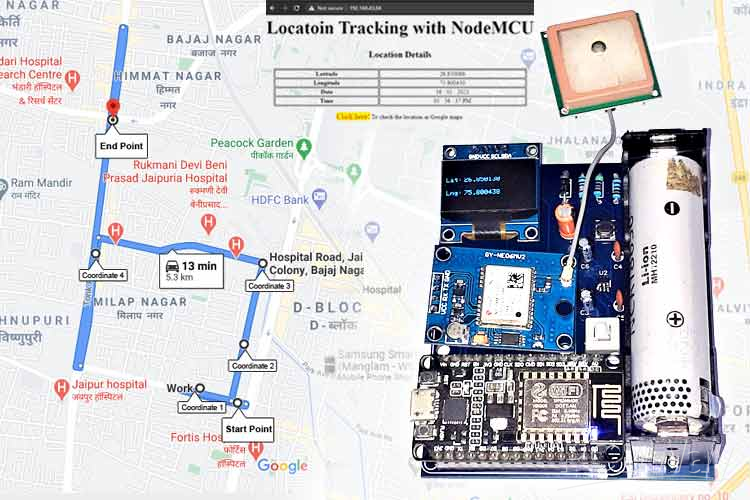
This project demonstrates how to build an IoT-based GPS tracking system using a NodeMCU (ESP8266) and a GPS module. The system captures real-time location data (latitude and longitude) and uploads it to Google Maps via the internet. It is ideal for applications like vehicle tracking, asset monitoring, and personal safety devices.
Key Features
- Real-time GPS location tracking
- Wireless data transmission using Wi-Fi
- Automatic logging of coordinates to Google Maps
- Low-cost and easy-to-build solution
- Compact and scalable for multiple applications
Components Required
- NodeMCU (ESP8266)
- GPS Module (such as NEO-6M)
- Jumper wires
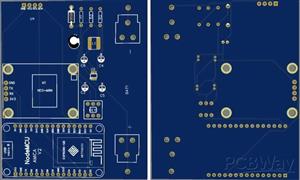
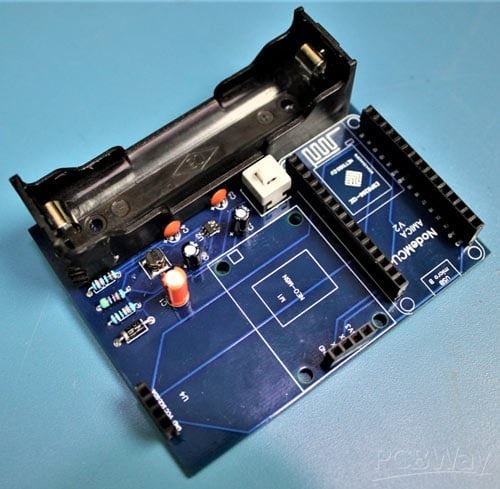
- Breadboard or PCB
- USB cable for programming and power
- Power supply (optional for standalone use)
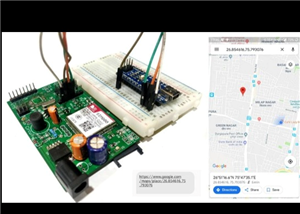
Working Principle
The GPS module receives satellite signals and determines the current location in terms of latitude and longitude. This data is sent to the NodeMCU via serial communication.
The NodeMCU processes the coordinates and connects to a Wi-Fi network. It then uploads the location data to an online platform like Google Sheets, which is integrated with Google Maps. This allows users to view and track the device’s movement in real time from anywhere.
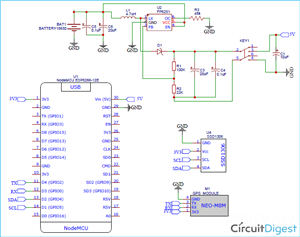
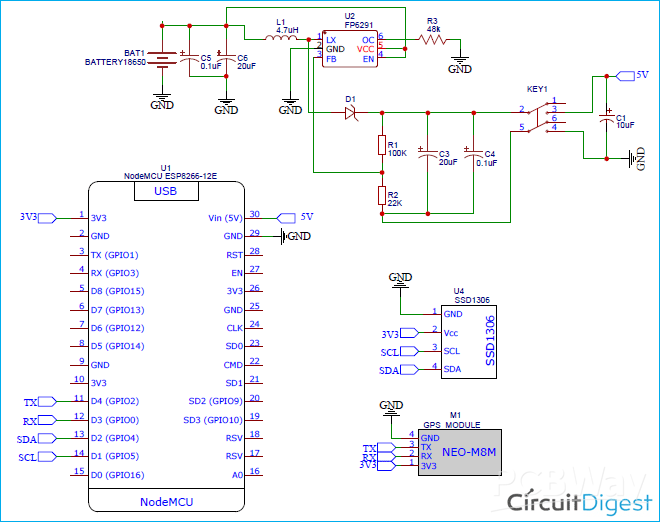
Circuit Connections
- Connect the GPS module’s TX pin to the NodeMCU RX pin
- Connect the GPS module’s RX pin to the NodeMCU TX pin (if required)
- Provide power to the GPS module (3.3V or 5V, based on module specifications)
- Ensure a common ground between all components

Software Setup
Arduino IDE Configuration
Install the ESP8266 board package
Select NodeMCU as the board
Install required libraries for GPS and Wi-Fi
Code Functionality
- Initialize serial communication with the GPS module
- Read and parse GPS data
- Extract latitude and longitude
- Connect to Wi-Fi network
- Send data to Google Sheets using HTTP requests
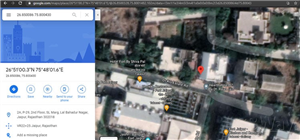
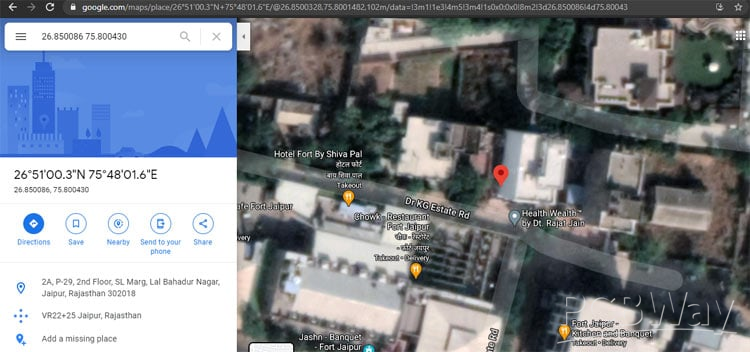
Google Maps Integration
- Use Google Sheets as a backend to store coordinates
- Create a Google Apps Script to receive data from NodeMCU
- Automatically log incoming GPS data into the sheet
- Use Google Maps to visualize logged locations
Applications
- Vehicle tracking systems
- Personal safety and tracking devices
- Fleet management
- Delivery tracking solutions
- Outdoor navigation and logging
Advantages
- Affordable and easy to build
- Real-time monitoring capability
- Wireless and scalable system
- Integration with widely used Google services
Future Improvements
- Add a GSM module for tracking without Wi-Fi
- Integrate battery backup for portability
- Include geofencing alerts
- Develop a mobile app interface for better visualisation
Conclusion
This IoT GPS Location Tracker project provides a simple yet powerful way to monitor location in real time. By combining NodeMCU, GPS technology, and Google Maps, you can create a reliable tracking system suitable for various real-world applications. Explore 100+ IoT projects with complete code, circuits, and real-world applications using Arduino, ESP8266, Raspberry Pi, and more. Discover a wide range of DIY PCB projects with downloadable Gerber files, practical circuit designs, and hands-on electronics builds to enhance your PCB design skills.
#include <TinyGPS++.h>
#include <SoftwareSerial.h>
#include <ESP8266WiFi.h>
#include <Wire.h>
#include <Adafruit_GFX.h>
#include <Adafruit_SSD1306.h>
#define SCREEN_WIDTH 128 // OLED display width, in pixels
#define SCREEN_HEIGHT 64 // OLED display height, in pixels
// Declaration for an SSD1306 display connected to I2C (SDA, SCL pins)
Adafruit_SSD1306 display(SCREEN_WIDTH, SCREEN_HEIGHT, &Wire, -1);
TinyGPSPlus gps;  // The TinyGPS++ object
SoftwareSerial ss(2, 0); // The serial connection to the GPS device
const char* ssid = "Galaxy-M20";
const char* password = "ac312124";
float latitude , longitude;
int year , month , date, hour , minute , second;
String date_str , time_str , lat_str , lng_str;
int pm;
//int numreadings = 10;
String latarray[20];
String lngarray[20];
//String current_latarray[10], current_lngarray[10], previous_latarray[10], previous_lngarray[10] ;
unsigned int i = 0;
const unsigned long Interval = 13000;
unsigned long previousTime = 0;
WiFiServer server(80);
void setup()
{
  Serial.begin(115200);
  ss.begin(9600);
  delay(2000); // Pause for 2 seconds
  Serial.println();
  Serial.print("Connecting to ");
  Serial.println(ssid);
  WiFi.begin(ssid, password);
  while (WiFi.status() != WL_CONNECTED)
  {
    delay(500);
    Serial.print(".");
  }
  Serial.println("");
  Serial.println("WiFi connected");
  server.begin();
  Serial.println("Server started");
  // Print the IP address
  Serial.println(WiFi.localIP());
  if(!display.begin(SSD1306_SWITCHCAPVCC, 0x3C)) { // Address 0x3D for 128x64
    Serial.println(F("SSD1306 allocation failed"));
    for(;;);
  }
}
void loop()
{
  unsigned long currentTime = millis();
  display.clearDisplay();
  display.setTextSize(1);
  display.setTextColor(WHITE);
  while (ss.available() > 0)
    if (gps.encode(ss.read()))
    {
     if (currentTime - previousTime >= Interval) {
      if (gps.location.isValid())
      {
        //Serial.print("Getting Data");
        latitude = gps.location.lat();
        lat_str = String(latitude , 6);
        longitude = gps.location.lng();
        lng_str = String(longitude , 6);
        latarray[i] = lat_str;
        lngarray[i]= lng_str;
        i++;
        Serial.print(i);
        if (i>=20)
       // {
          i=0; //reset to beginning of array, so you don't try to save readings outside of the bounds of the array
        // }
        Serial.println("Latitude:");
        Serial.println(latarray[i]);
        Serial.println("Longitude:");
        Serial.println(lngarray[i]);
        Serial.println();
        display.setCursor(0, 20);
        display.println("Lat:");
        display.setCursor(27, 20);
        display.println(lat_str);
        display.setCursor(0, 40);
        display.println("Lng:");
        display.setCursor(27, 40);
        display.println(lng_str);
        display.display();
        }
        previousTime = currentTime;
       }
      //}
      if (gps.date.isValid())
      {
        //Serial.print("Getting Time");
        date_str = "";
        date = gps.date.day();
        month = gps.date.month();
        year = gps.date.year();
        if (date < 10)
          date_str = '0';
        date_str += String(date);
        date_str += " / ";
        if (month < 10)
          date_str += '0';
        date_str += String(month);
        date_str += " / ";
        if (year < 10)
          date_str += '0';
        date_str += String(year);
      }
      if (gps.time.isValid())
      {
        time_str = "";
        hour = gps.time.hour();
        minute = gps.time.minute();
        second = gps.time.second();
        minute = (minute + 30);
        if (minute > 59)
        {
          minute = minute - 60;
          hour = hour + 1;
        }
        hour = (hour + 5) ;
        if (hour > 23)
          hour = hour - 24;
        if (hour >= 12)
          pm = 1;
        else
          pm = 0;
        hour = hour % 12;
        if (hour < 10)
          time_str = '0';
        time_str += String(hour);
        time_str += " : ";
        if (minute < 10)
          time_str += '0';
        time_str += String(minute);
        time_str += " : ";
        if (second < 10)
          time_str += '0';
        time_str += String(second);
        if (pm == 1)
          time_str += " PM ";
        else
          time_str += " AM ";
      }
    }
  // Check if a client has connected
  WiFiClient client = server.available();
  if (!client)
  {
    return;
  }
  // Prepare the response
  String s = "HTTP/1.1 200 OK\r\nContent-Type: text/html\r\n\r\n <!DOCTYPE html> <html> <head> <title>Location Tracking with NodeMCU</title> <style>";
  s += "a:link {background-color: YELLOW;text-decoration: none;}";
  s += "table, th, td {border: 1px solid black;} </style> </head> <body> <h1  style=";
  s += "font-size:300%;";
  s += " ALIGN=CENTER> Locatoin Tracking with NodeMCU</h1>";
  s += "<p ALIGN=CENTER style=""font-size:150%;""";
  s += "> <b>Location Details</b></p> <table ALIGN=CENTER style=";
  s += "width:50%";
  s += "> <tr> <th>Latitude</th>";
  s += "<td ALIGN=CENTER >";
  s += lat_str;
  s += "</td> </tr> <tr> <th>Longitude</th> <td ALIGN=CENTER >";
  s += lng_str;
  s += "</td> </tr> <tr>  <th>Date</th> <td ALIGN=CENTER >";
  s += date_str;
  s += "</td></tr> <tr> <th>Time</th> <td ALIGN=CENTER >";
  s += time_str;
  s += "</td>  </tr> </table> ";
   if (gps.location.isValid())
  {
    // s += "<p align=center><a style=""color:RED;font-size:125%;"" href=""http://maps.google.com/maps?&z=15&mrt=yp&t=k&q=";
     s += "<p align=center><a style=""color:RED;font-size:125%;"" href=""https://www.google.com/maps/dir/";
 //https://www.google.com/maps/dir/26.8172985,75.8286322/26.8181889,75.830…;
    for (int j=0; j<20; j++)
    {
    s += latarray[j];
    s += ",";
    s += lngarray[j];
    if (j<10)
    s += "/";
    }
    s += """ target=""_top"">Click here!</a> To check the location in Google maps.</p>";
  }
  s += "</body> </html> \n";
  client.print(s);
  delay(200);
 }
IoT GPS Tracker with NodeMCU and Google Maps
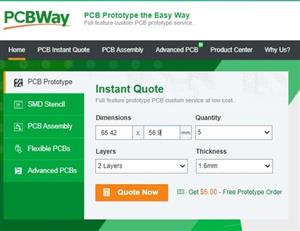
*Wpsload community is a sharing platform. We are not responsible for any design issues and parameter issues (board thickness, surface finish, etc.) you choose.


Attribution-MIT License
Read More⇒


Raspberry Pi 5 7 Inch Touch Screen IPS 1024x600 HD LCD HDMI-compatible Display for RPI 4B 3B+ OPI 5 AIDA64 PC Secondary Screen(Without Speaker)
BUY NOW


- Comments(1)
- Likes(1)
More by Jobit Joseph
-
 How to build a Wearable Air Quality Monitor Pendant using STM32 & SGP40 Sensor
This DIY Wearable Air Quality Monitor Pendant is a compact, battery-powered device designed to conti...
How to build a Wearable Air Quality Monitor Pendant using STM32 & SGP40 Sensor
This DIY Wearable Air Quality Monitor Pendant is a compact, battery-powered device designed to conti...
-
 Smart Digital Ludo Game Board with Multicolour PCB
Ludo, a beloved childhood game, holds a special place in our hearts with its simple and engaging gam...
Smart Digital Ludo Game Board with Multicolour PCB
Ludo, a beloved childhood game, holds a special place in our hearts with its simple and engaging gam...
-
 Electronic Dice with BLE Connectivity
Many of us fondly remember the joy of playing board games like Snakes and Ladders or Ludo during our...
Electronic Dice with BLE Connectivity
Many of us fondly remember the joy of playing board games like Snakes and Ladders or Ludo during our...
-
 3D printed Enclosure Backplate for Riden RD60xx power supplies
3D printed Enclosure for Riden RD60xx power supplies such as RD6006, RD6012, RD6018, RD6024 and RD60...
3D printed Enclosure Backplate for Riden RD60xx power supplies
3D printed Enclosure for Riden RD60xx power supplies such as RD6006, RD6012, RD6018, RD6024 and RD60...
-
 3D printed Enclosure for Riden RD60xx power supplies
 such as RD6006, RD6012, RD6018, RD6024 and RD60...
3D printed Enclosure for Riden RD60xx power supplies
3D printed Enclosure for Riden RD60xx power supplies such as RD6006, RD6012, RD6018, RD6024 and RD60...
-
 Suzuki Ignis Universal Armrest No Screw Adapter
I own a 2024 Suzuki Ignis. When I searched for an armrest for my car I couldn't find any domesticall...
Suzuki Ignis Universal Armrest No Screw Adapter
I own a 2024 Suzuki Ignis. When I searched for an armrest for my car I couldn't find any domesticall...
-
 Wireless Potentiostat for Electrochemical Analysis
This wireless potentiostat is based on the ADuCM355 SoC from Analog Devices, tailored for portable e...
Wireless Potentiostat for Electrochemical Analysis
This wireless potentiostat is based on the ADuCM355 SoC from Analog Devices, tailored for portable e...
-
 160 Channel Configurable DAC Controller
The DAC controller board features 160 individually controllable 16-bit DAC output. It can output vol...
160 Channel Configurable DAC Controller
The DAC controller board features 160 individually controllable 16-bit DAC output. It can output vol...
-
 ESP32 IoT Water Flow Meter with Real-Time Monitoring
OverviewThis project demonstrates how to build a smart water flow meter using an ESP32 microcontroll...
ESP32 IoT Water Flow Meter with Real-Time Monitoring
OverviewThis project demonstrates how to build a smart water flow meter using an ESP32 microcontroll...
-
 DIY GSM GPS Location Tracker with Arduino
Project OverviewThis project demonstrates how to build a simple and reliable location tracking syste...
DIY GSM GPS Location Tracker with Arduino
Project OverviewThis project demonstrates how to build a simple and reliable location tracking syste...
-
 IoT GPS Tracker with NodeMCU and Google Maps
OverviewThis project demonstrates how to build an IoT-based GPS tracking system using a NodeMCU (ESP...
IoT GPS Tracker with NodeMCU and Google Maps
OverviewThis project demonstrates how to build an IoT-based GPS tracking system using a NodeMCU (ESP...
-
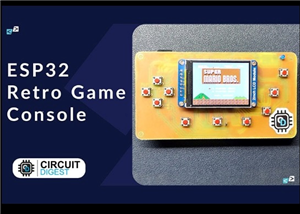 ESP32 Retro Game Console with OLED Display
OverviewThis project demonstrates how to build a compact, handheld retro gaming console using the ES...
ESP32 Retro Game Console with OLED Display
OverviewThis project demonstrates how to build a compact, handheld retro gaming console using the ES...
-
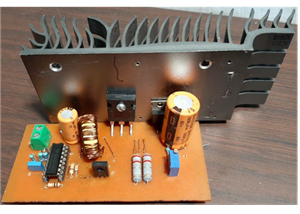 High Power Boost Converter Using TL494
OverviewThis project demonstrates the design and implementation of a high-power, high-efficiency DC-...
High Power Boost Converter Using TL494
OverviewThis project demonstrates the design and implementation of a high-power, high-efficiency DC-...
-
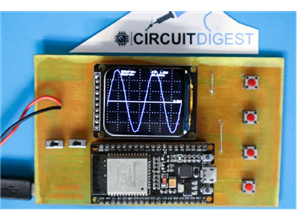 DIY ESP32 Oscilloscope Project
OverviewThis project demonstrates how to build a simple and affordable oscilloscope using an ESP32. ...
DIY ESP32 Oscilloscope Project
OverviewThis project demonstrates how to build a simple and affordable oscilloscope using an ESP32. ...
-
 ESP32 Desktop Weather Station
Project OverviewBuild a compact desktop weather station using an ESP32 that measures temperature, hu...
ESP32 Desktop Weather Station
Project OverviewBuild a compact desktop weather station using an ESP32 that measures temperature, hu...
-
 ESP32 Capacitive Touch Home Automation
OverviewMechanical switches wear out over time and can be prone to failure due to dust, moisture, or...
ESP32 Capacitive Touch Home Automation
OverviewMechanical switches wear out over time and can be prone to failure due to dust, moisture, or...
-
 ESP32-Powered Smart Energy Meter for Real-Time Monitoring
ESP32-Powered Smart Energy Meter for Accurate Consumption TrackingIn modern electronics and IoT appl...
ESP32-Powered Smart Energy Meter for Real-Time Monitoring
ESP32-Powered Smart Energy Meter for Accurate Consumption TrackingIn modern electronics and IoT appl...
-
 Build Your Own ESP32 AI Voice Assistant with MCP Integration
Project OverviewThe ESP32 AI Voice Assistant with MCP Integration is an advanced voice-controlled sm...
Build Your Own ESP32 AI Voice Assistant with MCP Integration
Project OverviewThe ESP32 AI Voice Assistant with MCP Integration is an advanced voice-controlled sm...
-
-
ARPS-2 – Arduino-Compatible Robot Project Shield for Arduino UNO
2538 0 5 -
A Compact Charging Breakout Board For Waveshare ESP32-C3
2994 3 8 -
AI-driven LoRa & LLM-enabled Kiosk & Food Delivery System
3202 2 1 -
-
-
-
ESP32-C3 BLE Keyboard - Battery Powered with USB-C Charging
3269 0 2


